Welcome to ESTS Xero Integration
App Name: ESTS Xero Integration
Developed by: ESTS (Expound Soft Tech Solution)
Thank you for installing ESTS Xero Integration!
This app is designed to seamlessly integrate your Shopify store with Xero, helping you manage products, customers, and orders effortlessly — all in one place.
Key Features
-
Sync Products: Instantly sync products from your Xero account into your Shopify store with a single click.
-
Sync Customers: Easily sync your Shopify customers to Xero for unified record management.
-
Sync Orders: Sync Shopify orders to Xero to keep your accounting and inventory perfectly synchronized.
With just one app, you can manage multiple essential operations between Shopify and Xero — saving time and reducing manual effort.
What You’ll Learn
In the following sections, you’ll learn how to set up and use the app effectively:
Note: Before proceeding, please ensure that you already have an active Xero account. If you don’t have one yet, visit
xero.com
to create your account and set up at least one organization in Xero.
Once your Xero account and organization are ready, you can continue with connecting your Shopify store to Xero.
Section 1: Set Up Shopify Store with Xero
Before you can start synchronizing data between Xero and your Shopify store, you’ll need to establish a secure connection between the two platforms.
This setup process is quick and straightforward. Simply follow the guided steps provided below. If you encounter any difficulties, our support team is always available to assist you.
We’ve also included step-by-step images throughout this section to help you fill in the required fields easily and confidently.
Once you’ve selected your desired plan, go to the “Settings” tab. There, you’ll find the fields needed to connect your Xero account — similar to the example shown below.
- First of all, click on “copy” button to copy the Redirect URL.
- Click on “Click here to know your Xero Client ID”.
You will redirect to
official Xero developer account page.
Now, Signup / Login your Xero
account.
After successful login, you
will redirect to Xero developer manage page. Click on the “New app” button
situated at top right corner of screen as highlighted.
Now enter the detail as
highlighted in image.
- Enter app Name.
- Select “Web app”.
- Paste the copied URL in company URL and Redirect URI section.
- Tick the checkbox of Xero T&C.
- Finally Click on “Create App” Button.
Now Xero will redirect you
on its manage app page. Now click on “Configuration” as highlighted in below
image.
Then click on “Generate a
secret” as highlighted in below image.
You will get “Client Secret” from Xero.
Both of this things Client ID and Client secret is essential
to connect your Xero account with your Shopify store.
Now copy this client ID and paste in XERO_CLIENT_ID section
as shown in below image.
Similarly copy the “Client Secret “and paste in the “XERO_CLIENT_SECRET”
section.
Now Click on the button “Connect to Xero”.
As you click on it, you will see this type of screen. The
page information would be varied according to your Xero account. You just need
to click on “Allow Access”.
Wait for a few seconds, you will be automatically redirect
back to our app Dashboard with message “connected to Xero”.
And because now you have successfully connected to Xero, you
will automatically shown Step 2: “Configure Xero Settings”. As shown in below
image.
Now its time to Configure Xero Settings. It is necessary to synchronize
Products, Customers and Orders from Shopify to Xero or vice-versa. Because Xero
have their own code for each and all things like to create product, they have
their own “Inventory Asset Account” code similarly to adjust their inventory
they have their own “Inventory Adjustment Account “code. Same way to create
sales invoice they have their own “sales account” code.
The account code would be varied according to countries and the
account.
Here we have given you example of code like “Inventory Asset
Account” code could be 630- Inventory. But to know the exact code you
need to visit your Xero ->accounting->charts of account. Here you can see
list of all codes that your account is using. So, you can pick up exact code
from here.
Still if you are not getting correct code than feel free to
contact us. We will help you to pick up the correct code.
So, lets go ahead, and according to our Xero account we have
choose
- 630 for “Inventory Asset Account”,
- 310 for “Inventory Adjustment Account”
and
- 260 for “Sales Account”.
- Now choose “Invoice Due Date” that you want to
for Xero Invoice.
Charge Tax on Shipping?
If you want to apply charge tax on shipping during export Shopify
order to Xero then enable it.
Sync automatically orders from Shopify to Xero?
If you want to Sync automatically orders from Shopify to Xero
enable it. This feature will only export Shopify order to Xero when you are
under plan limit of Products, Customers and Orders. As you exceed limit of the
plan you won’t automatically Sync Shopify Order to Xero. If your plan limit is
over then you need to upgrade the plan to continue sync data.
You can Check limit
of sync products, customer, and orders on app Dashboard.
Default Location
You can see the list of all location of your Shopify store.
Select one where you want to add product in your Shopify store from Xero when
you import products from Xero.
After this click on “Save Settings” button.
Once you click on it, it will again show you screen as shown
below.
It is because it again wants to ensure that the you want to
allow changes in Xero. So, click on “Allow access”.
Wait for a few seconds, you will be automatically redirect
back to our app Dashboard.
And because now you have done all things to Xero, you will show
all fields filled automatically.
That’s it. You are now ready to sync data between your Shopify
store and Xero.
Section 2: User Guide
In the section 1, we have learned
how to setup your Shopify store to Xero account.
Now let’s explore “ESTS Xero
Integration”.
Dashboard:
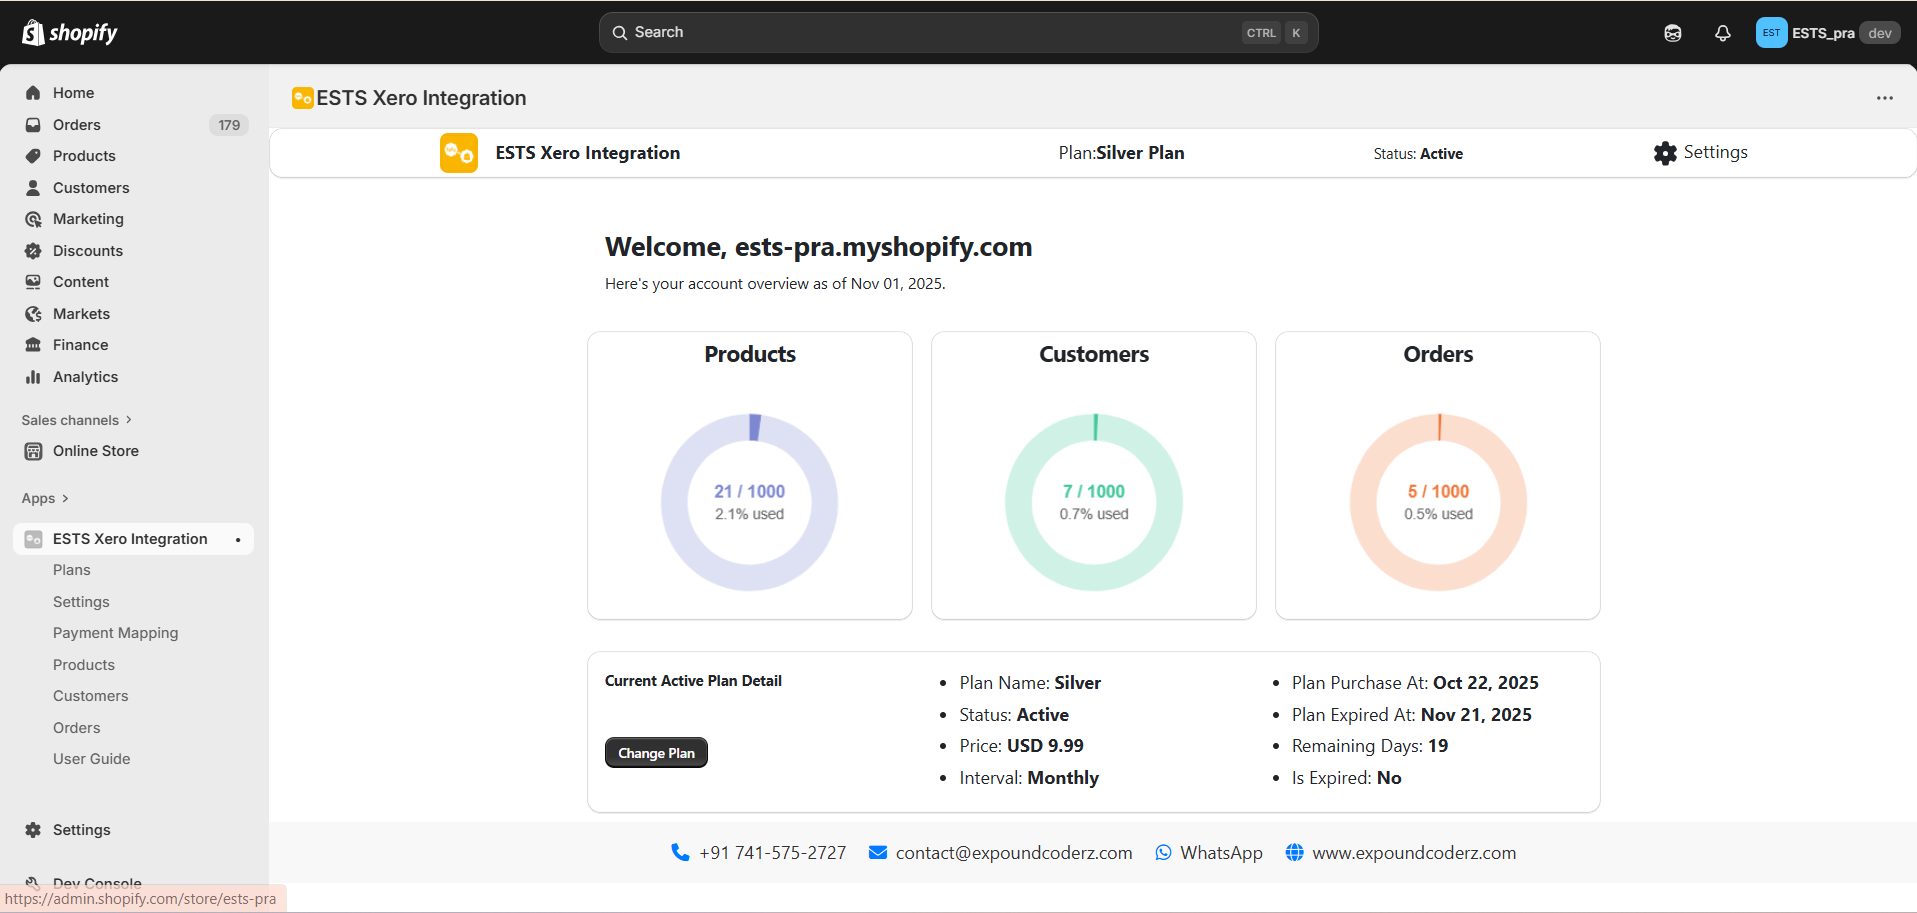
On the Dashboard you can see couple of things.
Here you can check about the active plan detail and check the plan status including
all details related to plan like name of plan Date of plan purchase, when will
your plan will expire, amount of your active plan, check the status of plan weather
it is active or expired.
You can also check the benefits of active plans. If you wish
to upgrade plan any time you can upgrade it from “Change Plan” option.
Below that, you can see the Products, Customers, and Orders
synchronization report in multiple forms. You can also see here that how much
data you have sync from this app and what is the remaining limit for data
synchronization. If you are in limit of your selected plan then it shows “within
limit” while if it reached out of limit then it shows “limit reached”. So, you
can identify that your plan limit is over. Once the limit is over and even you
have enabled the sync order automatically. It will not sync Shopify order in Xero
until you upgrade the plan. Once you upgrade the plan automatic sync feature
will start work.
Plan:
This is the plan page where you can choose the plan
according to your requirement.
Settings:
We have already setup in
Step 1. Now you have no need to touch this page again. But still, you can
change setting anytime you need to update.
Payment Mapping:
This
section is specially design for payment purpose. Here you can setup how you
want to manage the Shopify order payment type in Xero. For example, suppose you
have an order in Shopify in which payment mode is “Bogus” payment. While Xero
does not support Bogus payment. And in Xero you have “PayPal” In this situation
you want to manage that all Bogus payment of Shopify order should be treat as “PayPal”
in Xero.
So,
to handle this type of condition you can use this section.
Now
enter the payment type of Shopify order in textbox e.g. “Bogus”. Then select
Xero account that you wish to attach it e.g. “PayPal”. Click on “Add Mapping”
button.
Now
you can see that Bogus payment method has been linked to PayPal.
Products:
As
you can see in above image. You can see “Shopify Products” as well as “Xero
Products” in separate tab.
You
can search product of Shopify and Xero too.
To
sync Shopify product variant in Xero, simply click on sync button. If you want
to sync multiple product’s variant in Xero, select the checkbox and click on
button “Batch Sync Shopify” button. This button will only visible when u select
one or more products.
Once
you sync any variant to Xero then you can directly open that product in Xero By
clicking button “Open in Xero”.
Customers:
As
you can see in above image. You can see “Shopify Customers” as well as “Xero
Customers” in separate tab.
You
can search customer of Shopify and Xero too.
To
sync Shopify customer in Xero, simply click on sync button. If you want to sync
multiple customers in Xero, select the checkbox and click on button “Batch Sync
Shopify” button. This button will only visible when u select one or more customer.
Once
you sync any customer to Xero then you can directly open that customer in Xero by
clicking button “Open in Xero”.
Orders:
As
you can see in above image. You can see “Shopify Orders” as well as “Xero
Orders” in separate tab.
You
can search order of Shopify and Xero too.
To
sync Shopify order in Xero, simply click on sync button. If you want to sync
multiple order in Xero, select the checkbox and click on button “Batch Sync
Shopify” button. This button will only visible when u select one or more order.
User Guide:
That’s all about this app. If you need any help, you can
find it in User Guide section. Still if you are facing any issue out of this
section, related to our app or need help to setup we are here to help you please
feel free to ask.